Friday, June 29, 2012

Road Tripping Food and Tips


"Leave sooner, drive slower, live longer."  ~Author Unknown

Is it just me or does travelling on long road trips make you insanely hungry too?  For some reason in my pea sized mind I feel like when you are in the car calories and grams of fat don't exist.  Suddenly it is okay to eat all the trail mix in the world...and French fries, they are expected and approved for road trip diets.

Epic fail.  Maybe that is why every time I arrive at my destination I feel like complete and utter crap.  In the more recent years I really have been trying to pack more healthy nutritious snacks to accompany me on our journeys.

I decided that it was high time I compiled a list of my favorite munchies for road trips just in time for road trip season.
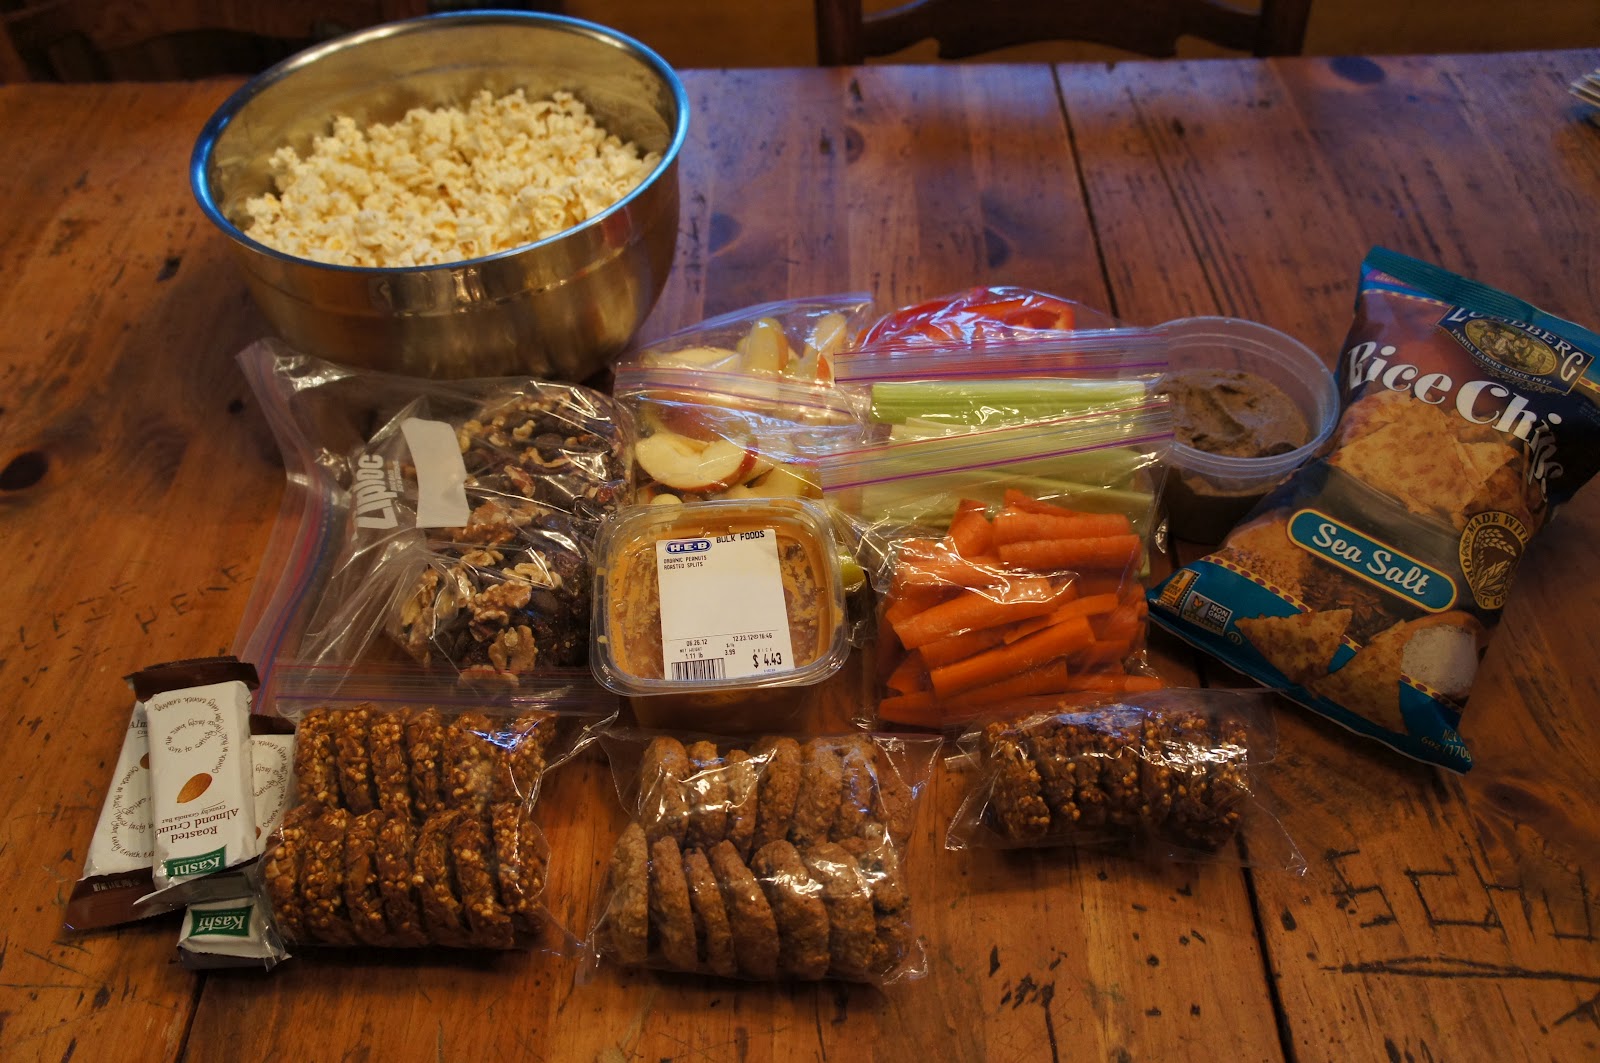
1.  Popcorn

This effortless light snack is perfect for those hands that just want to keep snacking.  Don't skimp on the prep of this, make the real stuff and toss it with some melted butter and kosher salt.  Trust me, so much better for you then a bag of over salted, over processed potato chips.  Making it from scratch is so simple!  You can pour 1/2 cup of popcorn kernels into a brown paper bag, roll the bag shut, and microwave for 3 - 3/12 minutes until popping stops.  Season accordingly!

2.  Apples and Peanut Butter

"Never drive faster than your guardian angel can fly."  ~Author Unknown

Slice up your apples, toss them in some lemon juice.  I like to keep mine in the cooler so the apples are crispy.  Also, use crisp apples not mushy ones like Macintosh...my favorite are pink ladies.  Reach for the natural un sugared peanut butter, in a low easy to scoop out container.

3.  Trail Mix


We like two versions of trail mix in our cars.

My Mom's version : Mini pretzels, raisins, and peanut M&Ms.

My Version (stolen from my Friend Shnabs) :  Toasted walnuts and pecans, raisins, dried cranberries, and dark chocolate chips.  (warning:  if you are traveling during these hot summer months there is a good chance the chocolate chips will melt...no worries, just an excuse to eat more...or you can store it in a cooler.)

4.  Hummus and Veggies


I don't know what is wrong with me, but I have a hard time cramming all these necessary veggies down my throat.  Don't get me wrong, I love veggies, but sometimes I feel like I am eating the earth and that no matter how fast I eat I can't get enough of them into my system.  Darn you veggies.  If you cover the veggies in a dip they are so much more appealing.

This time around I made black bean hummus.  So simple and delicious!  Will post this recipe soon!

5.  Rice Chips

These chips are a new favorite with us.  They are crispy, salty, and tasty!  They also come in other flavors like pico da gaio and lime....yum!


6.  Granola Bites:


This is a fun excuse to eat granola in the car without the mess.  I used a basic granola bar recipe and smashed them into greased muffin tins.  Baked them for 10 minutes, then let them cool completely before removing them from the pan.  I will also post this recipe soon!

7.  Cookies!!!


Cookies are always a good idea!  Typically I make something with chocolate, but with the summer temps being so high this time I opted for my applesauce oatmeal raisin cookie.  Yummy, not too crumbly, not to melty, perfectly chewy.

8.  Granola Bars

My personal favorite bars of choice are Kashi Honey Almond Flax chewy bars.  I also like Lara Bars.  If you want to make those from scratch see this post.

Besides snacking these are some Road trip rules I like to follow 
in order to have the best trip ever :

1)  Stop every 2 hours no matter what.  Chances are someone has to go to the bathroom, and if they don't it is a good idea to stop and stretch your legs.

2)  Do jumping jacks.  Whenever you do stop try to run around the car or do some jumping jacks.  After sitting in the car for so many hours you are bound to be restless and getting the blood pumping always helps!  Also, this majorly embarrasses the people you are traveling with, which is an added bonus.  

3)  If your road trip is over 12 hours do travel with at least 3 people in the car.  That way 2 people will be awake at all times while the other one rests.  This rule is especially important in my book if you are traveling through the night.  Be vigilant, and stay awake!

4)  Books on Tape make the trip so much more tolerable!  You have a few options when it comes to finding books on tape....or cd...or ipod. 

 -  Rent them from your local Library
-  Rent them from the Cracker Barrel Restaurants.  They charge you a high price up front, but when you return them you get most of the money back.
-  Download them from ITUNES or audiobooks onto your phone or ipod.

5)  Bring a pillow and a blanket...get rest whenever you can!!!!

6)  Music is key.  Hopefully you can all agree on at least a few common songs, if not this can be a problem...rap music for a long road trip is completely terrible!

7)  Pay attention to your Car's gas levels.  Coming from someone who has run out of gas before, trust me this one is important!

A pedestrian is someone who thought there were a couple of gallons left in the tank.  ~Author Unknown

8)  Don't spend most of the trip watching movies or on talking on your phone!  Pay attention and watch the countryside pass you by.  It is amazing how different the land can look in just a matter of hours!

I hope you all enjoy my little tips for road tripping!  Have a safe and fun road tripping season!

Eat your heart out,

Dagny


Friday, June 22, 2012

Toasted Coconut Brownie Bites


I recently took it upon myself to start a new ministry for the Catholic churches in our area.  After living here for 3 years and attending numerous Young Adult groups at the local churches that never really lasted very long, I decided to stop complaining and just take over.

Maybe it is because I am the 2nd oldest of 7 children, or maybe it is because I just like being in charge, but for some reason I like taking over...just ask anyone who knows me...I am bossy, I am the planner, I am the delegating one, and I am the "making it happen" person.  The thing that agitates me about most groups and organizations is that it always seems like more time is spent talking about how to make things work, and not enough time spent actually just making them work.  Less talk, more play.  I also really like working this way because I have lots of ideas, and if I have too much time to think about them it just gets crazy and confusing for everyone!

Adding this extra responsibility to my life has really pushed me over the edge with running out of time to get everything done each day.  As a result these brownies were invented.
Thus begins the story of how this idea came about:


You know when you promise to make brownies for something and then you forget until about 30 minutes before that something is about to happen?  Yeah, this happens to me...all the time.  This post is your solution.

I introduce to you the concept of using your muffin tin for more then muffins and cupcakes!

True story, I made brownies and packaged them in less then 25 minutes..and most importantly, they tasted scrumptious!

In order to have the best tasting brownies you need to know 3 things:

1)  Do not over mix, this will make your brownies more cakey then chewy.
2)  Do not overbake
3)  Do test the batter before baking.

In other news I am contemplating going watch the midnight feature of Brave tonight...but really, should one ever go see the midnight feature of a cartoon movie?  Upon further contemplation...I think not.


Toasted Coconut Brownie Bites


based on the Baked Brownie
adapted slightly by me
1¼ cups all-purpose flour
1 teaspoon salt
2 tablespoons dark unsweetened cocoa powder
11 ounces dark or semi sweet chocolate, coarsely chopped, or chips
1 cup (8 ounces) unsalted butter, cut into 1-inch pieces
1 teaspoon instant espresso powder, or instant coffee
1½ cups granulated sugar
½ cup packed light brown sugar
5 eggs, at room temperature
2 teaspoons vanilla extract
3/4 cup toasted unsweetened coconut
1. Preheat the oven to 350 degrees F.  Spray muffin tins with non stick spray of choice, or brush with melted butter.
2. In a medium bowl, whisk the flour, salt, and cocoa powder together.
3. Put the chocolate, butter and instant espresso powder in a large bowl and set it over a saucepan of simmering water, stirring occasionally, until the chocolate and butter are completely melted and smooth. Turn off the heat, but keep the bowl over the water and add the sugars. Whisk until completely combined, then remove the bowl from the pan. The mixture should be room temperature.
4. Add 3 eggs to the chocolate mixture and whisk until combined. Add the remaining eggs and whisk until combined. Add the vanilla and stir until combined. Do not overbeat the batter at this stage or your brownies will be cakey.
5. Sprinkle the flour mixture over the chocolate mixture. Using a rubber spatula (not a whisk), fold the flour mixture into the chocolate until just a bit of the flour mixture is visible.
6. Pour  2TBS of the batter into each prepared tin and sprinkle the toasted coconut on top. Bake in the center of the oven for 10-12 minutes, rotating the pan halfway through the baking time, until a toothpick inserted into the center of the brownies comes out with a few moist crumbs sticking to it. Let the brownies cool for about 5-10 minutes, and then using a spoon carefully scoop each bite out of the tins.
7. Store at room temperature in an airtight container or wrap with plastic wrap for up to 3 days.

Make these brownie bites of goodness, listen to this sweet song, and Eat your heart out.

Dagny


Monday, June 18, 2012

Buckwheat Yogurt Waffles


Waffles truly are a thing of beauty.  Look at all those lovely nooks and crannies...they exist solely for the purpose of being slathered with butter and maple syrup.  Is this waffle speaking to you?  Listen, it will lead you on a journey to happiness...I kid you not.

Every time I make a waffle I think of my 21st birthday.  I realize most people have memories of alcohol on their 21st birthdays, but not me...I have waffle memories. : )  I was surprised by 2 of my friends with a basket of breakfast things on the morn of my 21st birthday...talk about the perfect gift for me!  Inside of that basket lay a sweet little waffle maker.  Little did I know that so many memories would stem from that  appliance.


One time we decided to set up a rogue waffle making operation outside of our school chapel.  After we ate our waffles we started snagging random people exiting after the end of Mass and offered to make them a waffle right then and there.  It was actually quite funny, and a prime example of many of the unique and creative adventures my friends and I embarked upon.  If you want to make people happy plug in a waffle iron in a random location...say your desk at work...and make them waffles.  Oh snap...I just had a brilliant documentary idea...a day in the life of a waffle maker.  One person travels the world making strangers waffles and changing the world.  Boom...New York Times Bestseller list here I come!

Now I understand that the word "buckwheat" might scare you away from this recipe.  Please trust me, and believe in the power of the buckwheat...and no, it is not a kid from the "Little Rascals."  Hold up, just had another brilliant idea...if I ever have my own kids I am naming them after my favorite grains..."Kamut", "Millet", "Quinoa", "Spelt."  How awesome would that be?  Of course knowing my luck they would all end up ironically being gluten intolerant and that would just be cruel.


In other news I recently discovered that you can watch the entire series of Dr.Quinn Medicine Woman on YouTube.  Don't judge.  Never underestimate the effect that really cheesy old shows with terrible acting can have on you... really...it warms the soul.


Make these waffles.  Watch Dr. Quinn Medicine Woman.

Eat your heart out,

Dagny

BUCKWHEAT YOGURT WAFFLES

1 cup Buckwheat flour (or your favorite whole grain flour...i.e. whole wheat, kamut, etc...)
1 cup all purpose flour
2 TBSP Brown sugar (or raw sugar, coconut sugar)
1 TBSP Baking Powder
1 tsp salt
1/4 tsp cinnamon
3 large eggs, separated
1 cup plain Greek Yogurt, or sour cream
1 1/2 cups milk
1 stick unsalted butter, melted

1.  Preheat waffle iron.  In large bowl sift together the flours, sugar, baking powder, salt and cinnamon.
2.  In medium bowl whisk together the yolks, yogurt, milk, and butter.  Pour the wet ingredients into the dry an mix just until combined.
3.  In a separate bowl beat the egg whites until stiff, then fold into the batter.  DO NOT OVER MIX...this will deflate the egg whites and yield a flat boring waffle...no bueno.
4.  Ladle about 3/4 cup of batter onto waffle iron.  Bake until waffle is golden brown.
5.  Serve with warm maple syrup and fresh ricotta cheese for best  results.

This kid just ate the waffles and look at her positive reaction...if you eat these waffles you too can be this cute. : )


Monday, June 11, 2012

Oatmeal Cake with broiled Caramel Coconut Topping

I don't know why this cake makes me think of old people, but it does.

I love old people.  I am pretty sure I will be a really cool old person.  In college people used say I reminded them of their grandmas...I can see how this might sound like a bad thing, but honestly I took it as a compliment.

Old people rock.  They are so wise, and they move so slowly...which means they only do things that really matter.  Every time I see an old person I instantly want to hold the door for them, or help them into their cars.  Many a time at the grocery store I offer to empty their carts for them, and they usually respond with a smile, but insist they can do it on their own.  Pretty sure it is a pride thing, and I am okay with that...all I am saying is that when I am old I will be willing to let everyone wait on me hand and foot!  Consider yourself warned!

Now speaking of old people, let's talk about my Mom.  Ha ha...just kidding Mom, you aren't old, really you aren't. : )  If you really looked old then why do people keep thinking we are sisters...and yes, this hurts my confidence and makes me feel older then I am...especially since there is a 27 years age difference between us...but I really can't hold it against you...but secretly I do.

Now that I find my days very busy with work, and recently taking on a new responsibility...which I will tell you about at another time...my Mom now has to take on more of the cooking/baking then she usually does.  Before when my time was more available she would ask me often to make cookies, or something for her various activities and functions she had to attend.  Now that I don't have the time to bake on command, she is baking more and more.  So proud of her!!!

One of her recent creations was this lovely oatmeal cake.  It is simple, and delicious. The original recipe called for a lot more sugar, so we scaled it back thinking it would be too sweet, so glad we did.

On an unrelated note, I feel inclined to talk about another movie.  I know this movie has been out for a while, but I have yet to sing its praises on here...yep, you guessed it, Hunger Games.  I realize this is a trendy movie, and for that reason I really didn't want to watch it, but I did, and I loved it.

As soon as the movie was over I went home and read the first book.  Then I read the second book, and am waiting to get the third one..well I almost finished the second book, I can't bring myself to finish the 2nd one and left one chapter unread for now.  You know when you just don't want to finish a book because you don't want the story to end?  I don't want it to end.

I really can't tell you why I like these books so much.  The writing is simple, nothing too exceptional.  The plot is interesting, but not completely unheard of.  The characters are strong, but don't have super powers.  I really can't put my finger on it, but I am hooked...and can't wait for the 2nd movie to be released!!!!  So if you are looking for some super light summer reading, look no further my friend. : )

Watch Hunger Games, Read Hunger Games, and make this cake!

Eat your heart out,

Dagny


Oatmeal Cake
adapted from the Penzey Spice Catalog

Cake:

1 cup oats
1 1/4 cups boiling water
1/2 cup butter, softened
3/4 cup sugar
3/4 cup brown sugar
2 eggs
1 tsp vanilla
1 1/2 cups flour
1 tsp baking soda
1/2 tsp salt
1 tsp cinnamon

Topping:

1/4 cup butter, softened
1/4 cup heavy cream
3/4 cup brown sugar
1 cup unsweetened coconut

Preheat oven to 350 degrees.  Grease and flour a 9x13 cake pan, and set aside.

In medium bowl combine the oats and the boiling water and let stand for 10 minutes.  In a separate mixing bowl cream the butter and sugars until fluffy.  Add the oats/water mix and mix until combined.  Add the eggs, and vanilla and mix until combined.  

In a separate bowl sift together the flour, baking soda, salt, and cinnamon.  Gradually add to the wet ingredients and mix until well combined.  Pour into prepared pan.  Bake for 30-35 minutes until brown and knife comes out clean.  Remove from oven.

Preheat the broiler in your oven.  In a bowl combine all the topping ingredients and mix well....this mixture will be thick.  Spread evenly onto the warm cake.  Place the cake back in the oven, 2" from the broiler.  Broil until browned lightly, about 2-4 minutes.  Remove from oven and cool on a wire rack.


Thursday, June 7, 2012

Pineapple Cake and Summer Break

Someone had to eat the first slice.

Do you like how my post title totally rhymes?  I planned that.  Yeah, I am that awesome.

Now listen up.  If you are a teacher right about now I am super jealous of you.  You are about to go on break for a long period of time.  Do you realize how awesome that really is?  I mean when you vacation you use terms like "weeks", "months", or "summer".  I understand you have one of the toughest jobs, but really you are compensated for your time, and you really are sitting pretty.

I worked in education for a few years after college, and this idea of being off from work for the summer has been really hard for me to shake since leaving that field of work.  Really, it is.  Many days I consider returning to education...but then I remember that will mean having to discipline other people's undisciplined children and I change my mind.  Good luck with that, and you 100% deserve your summer break.

What are your plans this summer?  I sure do hope they involve eating pineapples, and if they don't you should seriously reconsider your plan of action.

They should also involve smoothies, and lots of them.  Speaking of smoothies I really need to invest in a sweet blender.  Maybe this one will arrive on my doorstep for my upcoming birthday : )  Hint hint...note to self...dream on, dream on.

While you are dreaming allow your thoughts to wander in the direction of this sweet, little, simple, and perfect cake.  Are you there yet?  Okay now imagine a moist, and pillowy yellow cake covered in a slight glaze of pineapple and caramel goodness.

Now eat it.  You welcome.

This cake is easy and quick to make...really I assembled it in no time at all and ate it in even less time. : )


Pineapple Cake
adapted from Food and Wine Magazine

3/4 cup plus 2 TBS brown sugar
1 1/2 sticks unsalted butter, room temperature
1/2 tsp vanilla bean paste, or 1 tsp vanilla
1 cup crushed pineapple, juices drained
1/2 cup sour cream
2 eggs
1 tsp vanilla
1 1/4 cup all purpose flour
3/4 cup granulated sugar
1/2 tsp baking powder
1/4 tsp baking soda
1/2 tsp salt

Preheat oven to 350 degrees.  Butter and flour a 9" round cake pan.  Butter an 8-inch round cake pan. Sprinkle the bottom with 2 tablespoons of the brown sugar.

In a large skillet, combine the remaining 3/4 cup of brown sugar with the 1/2 stick of butter and the vanilla  and cook over moderately low heat until the butter is melted. Add the pineapple and cook over moderately low heat, stirring occasionally, about 5 minutes. Remove from heat and pour mixture into bottom of the pan.

In a bowl, beat the butter with the granulated sugar.  Add the eggs and vanilla, then the sour cream.  In another bowl, whisk the flour, baking powder, baking soda and salt.  Add to the wet ingredients and beat until smooth.

Spoon the batter over the pineapple mixture and spread it evenly. Bake for about 40 minutes, until the cake is deep golden. Let cool for 5 minutes on a rack. Run a knife around the edge of the cake, invert it onto a plate and remove the pan. Replace any pineapple that may have stuck to the pan. Serve warm or at room temperature.


Isn't this a lovely looking cake?  I highly suggest you drop all your plans for the day, go home, and make this now.  : )

Eat your heart out,

Dagny